Tuesday, November 29, 2011

Is your Cloud Secure?Security Vulnerabilities Discussed


With the rise of cloud computing users can seamlessly share data among different devices with ease.There are a number of cloud services available now as the enterprise or personal demand for effective data storage has increased. Users easily switch to or avail cloud services without thinking much about the security issues involved in the cloud.


Is your confidential data stored in the cloud secure? How vulnerable is your data cloud?


I'm trying to  address these two issues in this article


Security:


There are Possibilities of virus or malware infections even-though the cloud is equipped with Anti-Mal ware and Antivirus Technologies.As you may or will be sharing the hardware used by another user to access your data there are possibilities of external attacks focusing on this cloud characteristic.There are many formats of files uploaded to cloud there are chances that a file downloaded may be infectious because the cloud Antivirus may be outdated.
A cloud is based on mainly 3 components WebApplications and Services,Cryptography(layer) and the  virtualization technique used to give you the feeling that you are using your own system.These basic components have their own security vulnerabilities.


Stability and Integrity:
You give all your valuable data to a company and one day they say that that are going to close down.What will you do?You will say that i will take a backup,but if it is a sudden problem and all your data is lost?


You cannot rule out such possibilities even though slim.So you cannot trust any cloud provider 100%.Cloud Severs requires high computing power and high Up time in order meet your requirements ,it may not be met on all situations.


How to Reverse a Video Quickly and Easily with Virtual Dub


Have you watched Videos being played from from the end to start ie:In a Reversed Manner in Movies.
eg:cars going backwards .Some of You might be Wondering how to do this? You can easily Reverse a Video and make it playback from the end point to start  in a reversed manner.This Tutorial will teach you ,how to reverse a video easily without any costly video editing tools.


Before starting, You need some free Tools Virtual Dub -A free video editor for editing and encoding  and AviSynth(A Script based utility used for Video Editing)


Download Virtual Dub from www.virtualdub.org


Download AviSynth from www.avisynth.org


Extract the Archive containing Virtual Dub to a required folder and then install AviSynth using the Setup provided.


Following are step by step Tutorial to reverse a Video using Virtual Dub and Avisynth
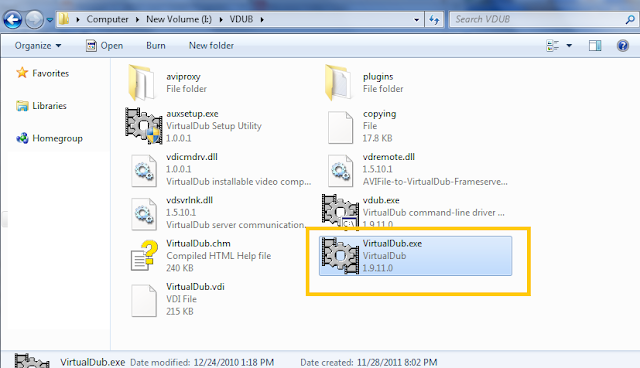
  • After Installing Virtual Dub and Avi synth,Open Virtual Dub( Virtual Dub.exe)


  • Open the Video which you want to reverse by  going to File>Open Video File
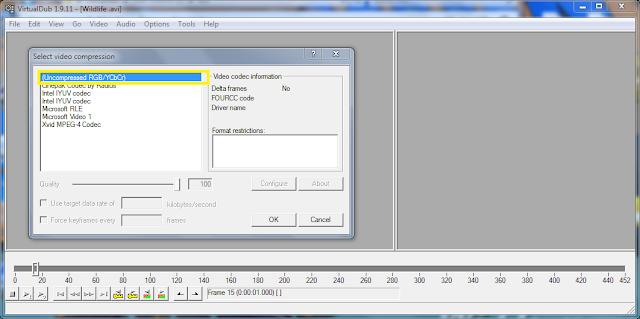
  • Go to Video>Compression and a dialog will open up asking you to select a Video Codec,You will have to save the video without any compression in order to reverse it.So,select 'Uncompressed RGB/YCbCr"


  •  Click on OK,Then you will have to save a copy of this uncompressed video.To do that go to File>Save as AVI,then save the copy by giving a new file name,in my case I'm  giving the name as 'Reverse.avi'
  • Click on Save,Dialog box will open up giving the progress of the video Rendering wait for it to complete
  • After Completion  go to the folder that you have placed the Uncompressed video(Reverse.avi) and Create a New Text File(.txt) in that folder and enter the following line into it
       AviSource("Your Video File Name").Reverse()
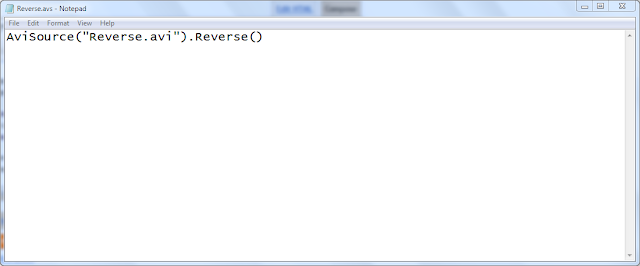
       In my case,since i have saved the video with the name Reverse.avi,i enter the following line to the text file        AviSource("Reverse.avi").Reverse()
        This Serves as the Script for Avisynth for reversing the Video
  • Save this Text document with same name of the Video with .avs extension ,in my case i save it as 'Reverse.avs' in the same folder which has the uncompressed video file ('Reverse.avi') which requires the reversing effect to be applied.
  •  Now,Open Virtual Dub and Go to File>Open Video File and Open this .avs file(Reverse.avs) .The Video will open Up.

  • In order to apply reverse effect ,Got to File>Save as Avi,Give the name for the Reversed Avi file and Click on Save,Wait for the rendering to complete.Once done open the newly created Video file and see the magic, the video will be played from end to start ie:it will be reversed.
Note:The Uncompressed Video file will be of large size ,you can reduce the size of the Reversed Video by Opening Virtual Dub and Going to Video>Compression and selecting the desired compression codec,say XVID.If you are unable to open the video file in Virtual Dub due to some codec issues Download the Klite Codec Pack http://www.free-codecs.com/download/k_lite_codec_pack.htm and Install it.

                        If you like This Article Please Comment on it.

Thursday, November 24, 2011

The Unsolved 'This is Not a True Type Font' Exception in C# Revealed and the Final 'SOLUTION'

Almost all Forums have a Discussion relating to 'Only true type fonts are Supported.This is not a true Type Font' Exception thrown in C#/.NET when a non true type font or a true type font with invalid metadata is selected from a Font Dialog.
This exception occurs because GDI+ Only supports True Type fonts. Modern/open type fonts are  not Supported by C#.Open Type fonts has been created by merging the old True Type and PostScript Fonts, as the result the Open type font may have a true type or postscript specification.

Although the Font Dialog control was designed to filter out these Non True Type fonts by using ChooseFont() API call with the CF_TTONLY option ,some Fonts may represent or call themselves as true type fonts.These are the Fonts with bad/Invalid MetaData that causes the Exception.

The Solution???
Unfortunately there is NO SOLUTION,I have found articles on the web giving the following solutions these include
  • Setting FontDialog.AllowSimulations property to false.
  • Setting FontDialog.AllowScriptChange property to false
These don't solve the Problem,A person had reported this bug to MicroSoft and here is their Reply:


Posted by Microsoft
This is a GDI+ issue and no changes are planned to that code base, therefore we cannot fix this bug. 
Posted by Microsoft
The Microsoft Sub-status is now "Investigating" 
Posted by Microsoft 
Note to customer: This only seems to be an issue at design time. You *can* set the font to VisualUI at runtime. We will continue looking into this from the designer perspective. 
Posted by Microsoft
Thanks for reporting this bug, we have been able to repro this issue and are investigating. 
Posted by Microsoft
The Microsoft Sub-status is now "Reproduced"
Thanks for reporting this bug, we have been able to repro this issue and are investigating.


This was Reported in 2005 and there is not a solution yet.The only Solution that i can offer is designing your own custom font picker or font selector that displays only true type fonts using the FontFamily class that returns only valid true type fonts. 
See these links to get started
Custom Font Dialog in WPF
Color and Font Selector Project hosted at Code Project
So,these are the currently available solutions to the Invalid Font Problem of the Font Dialgo control in C#.
Comments are always appreciated.

Thursday, November 17, 2011

C Program to implement Inter Process Communication(IPC) by using Pipe

Inter Process communication is a technique by which a thread in one process shares some information with threads in other processes.A pipe is a buffer,specifically a FIFO(First in First Out) buffer that has 2 ends,a read end and a write end.A thread can write or read depending on the file reference it has.
read() is used to read data and write() is used to write data.

The following is an implementation of Pipe in C Language.There is a main process P1 and 2 child processes C1 and C2 , the main process reads a string and passes it to one of the child process ,the child process C1 receive string from P1,find its length and sends the value to P1.C1 also reads an integer array of length equal to the length of the string and sends it to C2.C2 receive integer array from C1,find the sum of the elements and sends the sum to the parent process P1.The sleep() function is used in the program to suspend the processes for a desired interval of time.
The complete C language source code of  this example program that  implements IPC(Interprocess Communication) using PIPE is given below.
 #include<stdio.h>  
 #include<unistd.h>  
 #include<string.h>  
 void main()  
 {  
 // www.c-madeeasy.blogspot.com  
  int pid[2],pid1[2],pid2[2],pid3[2],pid4[2];  
  int a[20],i,l,s=0;  
  char str[20];  
  pipe(pid);  
  pipe(pid1);  
  pipe(pid2);  
  pipe(pid3);  
  pipe(pid4);   
 if(fork()==0)  
 {  
  sleep(5);  
  close(pid[1]);  
  read(pid[0],str,sizeof(str));  
  for(i=0,l=0;str[i]!='\0';i++)  
  l=l+1;  
  close(pid3[0]);  
  write(pid3[1],&l,sizeof(l));  
  sleep(6);  
  printf("Enter %d array elementz:",l);  
  for(i=0;i<l;i++)  
  scanf("%d",&a[i]);  
  close(pid1[0]);  
  write(pid1[1],a,sizeof(a));  
  close(pid4[0]);  
  write(pid4[1],&l,sizeof(l));  
 }  
 else if(fork()==0)  
 {  
  sleep(2);  
  close(pid1[1]);  
  close(pid4[1]);  
  read(pid4[0],&l,sizeof(l));  
  read(pid1[0],a,sizeof(a));  
  for(i=0;i<l;i++)  
  s=s+a[i];  
  close(pid2[0]);  
  write(pid2[1],&s,sizeof(s));  
 }   
 else    
 {  
  printf("\nEnter string:");  
  scanf("%s",str);  
  close(pid[0]);  
  write(pid[1],str,sizeof(str));  
  sleep(7);  
  close(pid3[1]);  
  read(pid3[0],&l,sizeof(l));  
  printf("\nThe string length=%d",l);  
  sleep(8);  
  close(pid2[1]);  
  read(pid2[0],&s,sizeof(s));  
  printf("\nSum=%d",s);  
 }  
 }  

Saturday, November 12, 2011

What is Google 2 Step Verification and How to Setup it ?


  • What is Google 2 Step Verification?
Google 2 Step Verification is an additional security measure provided by google to prevent your mail account from being hacked.2 Step Verification involves a series of two primary steps while signing into your google account
The First step is usual signing in with your User ID and password  the second step is entering a one time use code generated by google which will be send to your phone by SMS or by a Voice Call.


  • How to Setup Google 2 Step Verification for Your Google Account?
You can easily setup the 2 step verification procedure for your google account with a few clicks.Before setting up make sure that you have setup-ed an alternative e-mail id,to recover your password in case you have lost or forgotten to take your  phone.
Given below is a step by step tutorial to setup 2 step verification for your google account
  • Log In to your google account then go to http://www.google.com/accounts
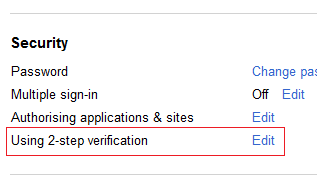
  • From the Account Overview Panel click on the 'Edit' link next to Using 2-step verification in the Security Section.

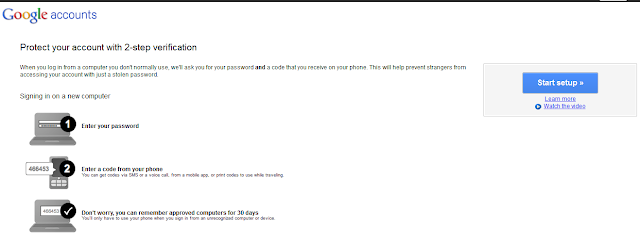
You will be asked to enter your password for  validation then you will be taken to the sign up page for 2 step verfication.

 
  • Click on 'Start Setup' and you will be directed to another page
  •  Enter your Mobile Number and choose the method of verification (SMS/Voice call).
  • Click on Send Code.Depending on the type of verification you will receive a sms or voice call from google providing the verification code.Enter the Code and click on verify.
  • In the next page you will be asked whether to remember this computer for 30 days so that you don't need to enter the code for next 30 days. After 30 days a new code will be send to you.If you uncheck this option you will need to enter a newly generated code every time you log in

  • In the Next Page Click on TURN ON 2 STEP VERIFICATION.Done,the process is now complete.
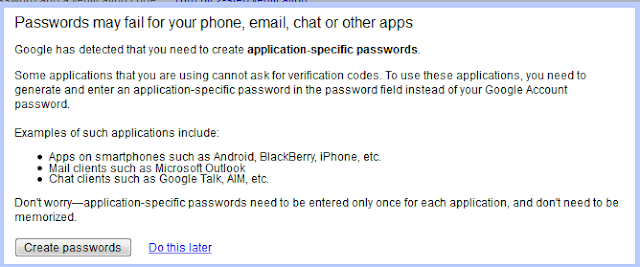
  •  The next page will greet you with a message lke this
  • This only necessary if you use the  Other Softwares or Apps as Stated.So just click on 'Do this Later'
  • Done!Your Google account is now secured with two layers of protection.This is a very good solution that google offers to protect its users from account theft when using other computers to login to your their google account.
Have any Queries or want to say thanks,then leave a comment.

    Wednesday, November 9, 2011

    A Good and free Custom Progress Bar Control with Adjustable Color for C#

    The customization options for the progress bar control in .NET/C# is highly limited as the progress bar will take up the default color pattern/visual style of the current operating system.You cannot change the back color or fore color of the progress bar even though the IDE/Visual Studio offers such options.
    When the program is executed since the visual styles are enabled the progress bar will take up the visual style of the current operating system.You can solve this iisue by disabling the visual styles for your application by removing this line

    Application.EnableVisualStyles 

    from your starting class,But doing this will make your application look classic.So How can you solve the progress bar color issue? A better option is to go for third party progress bar controls for c#.There are lots out there,but you got to pay for it.
    Also there are some pretty impressive controls available for free.Progress Bar Plus

    http://www.codeproject.com/KB/progress/ProgBarPlus.aspx is such a project hosted at CodeProject.


    It offers variety of designs,colour patterns,shapes whatever you wnat for free.The implemetation instructions are provided at this link.The project is licensed under The Code Project Open License (CPOL) and is free to be used without paying a fortune.


    Sunday, November 6, 2011

    How to Recharge BSNL 3G DataCard Online

    There are a lots of Online Services Offering to Recharge your Mobile,DTH or DataCards.But you might not have found at least one offering recharge or denomination for your BSNL 3G Data Card.BSNL Itself offers this facility but it does not have support for Most Debit Cards so you have to look out for other services.

    In this Post will tell you how recharge your BSNL 3G DataCard Online using your credit/debit card or net banking.PayTM is an Online recharge service offering mobile recharge for all operators,they also provide the facility add denomination or recharge for your 3G Data Card.
    Follow these simple steps to recharge your data card


    • Select your Operator as BSNL and Operator Circle.
    • Enter the Exact Denomination /Recharge amount as stated by by BSNL in your circle  that will give you a specific amount of data usage.Below is the Recharge chart provided by BSNL on their Website.        
    Data RCV in Rs.(Inclusive Service Tax)
    Day/Any time usage in MB
    Night * usage in MB
    Total bundled free Usage in MB
    Validity (days)**
    Data Charges in Rs./10KB*** (except APN 'bsnlstream')
    Data Charges in Rs./MB***(For APN bsnlstream)
    100
    225
    225
    15
    0.04
    0.25
    200
    500
    500
    15
    0.04
    0.25
    400
    1000
    1000
    30
    0.04
    0.25
    606
    1000
    2000
    3000
    30
    0.04
    0.25
    716
    2000
    2000
    30
    0.04
    0.25
    1250(750)
    5000
    5000
    30
    0.04
    0.25
    1800(1260)
    10000
    10000
    30
    0.04
    0.25
    2250(1575)
    15000
    15000
    30
    0.04
    0.25
    2500
    20000
    20000
    60
    0.04
    0.25
    3000
    30000
    30000
    90
    0.04
    0.25
    3100
    15000
    15000
    180
    0.04
    0.25
    5000
    30000
    30000
    180
    0.04
    0.2

    • Click on Proceed,they will ask you to create user account,create one and choose the Mode of Payment as per your choice.After the Payment has been Processed you will have received your denomination you have requested.

    Saturday, November 5, 2011

    HD or Full HD?What to Buy?Need to Know Buying Advice before you Buy

    Today most TV's and Monitors offer support for HD Content.HDTV has become common and offers wide range of functionality including smart applications  and 3D Support.HD Ready Display comes in two variants
    • HD(720p)
    • FullHD(1080p)

     At leastsome of us are confused by this specifications and has difficulty in deciding what to buy.
    Full HDTV(1080P) Cost more than a HDTV(720p).So before you buy there are some things you need to know
    • What is the difference between HD and FullHD?
           HD Ready Displays offer a Native Resolution of 1366x768 pixels while a Full HD TV offers     
           1920x1080 pixels native resolution.Native Resolution is the Original or the Normal Resolution
           at which the display device is configured to display images.Images needs to be down scaled or
           upscaled if it is not matching the native resolution of the Display.
           So HD Display can display up to a Resolution of 1366x768 pixels while Full HD  can display
           images of resolution up to 1920x1080 pixels.Smaller or Larger or smaller images are Unscaled \
           or Down scaled as Necessary.  
    •  What is the Relation Between Screen Size and Capability to Display HD or Full HD Content?
              There is no need to buy a Full HD Display/HDTV if you are Buying a television of screen size
              less than 42 Inches.You will not be able to observe any difference between HD or Full HD
              Content on a Smaller screen like a 32 inch TV.So there is no point in buying a Full HD Display
              if you are looking for a Screen size less than 42-50 Inches.

     So,if you are Planning to buy a HDTV or Display.Please Make sure that you only go for Full HD if you  are looking for a screen size of at least 42 inches.

    Which is the Best Photo Watermarking Software

    Photo Theft is becoming more and more common in the web with the outburst of social websites like Facebook,Google Plus and Image sharing se...