Tuesday, December 20, 2011

C Program to Perform First Come First Serve Process Sheduling


First Come First serve is a Processes scheduling algorithm in which the process which arrives first gets System Resources First.The process with the least arrival time gets the system system resources first followed by processes with higher arrival time.


Waiting Time:
The Time Process has to wait in the ready list to get the system resources for its execution


Execution Time:
The time the process requires to perform the computation.


Turn Around Time:
The Total Time the Process Requires for completion waiting time+Execution Time


The following is a C Program Source Code of a First Come First Serve algorithm implementation.The processes are scheduled according to the arrival time and finally the waiting time and turn around time of the processes are calculated.


 #include<stdio.h>  
 void main()  
 {  
  int i,ex[20],tr[20],wt[20],n,ar[20];  
  int j,k,temp,od[20];  
  float b=0,c=0;  
  printf("\n Enter the number of processes : ");  
  scanf("%d",&n);  
  for(i=0;i<n;i++)  
  {   
  printf(" P%d = ",i+1);  
  printf("\n Excecution time : ");  
  scanf(" %d",&ex[i]);  
  printf("\n Arrival time : ");  
  scanf("%d",&ar[i]);  
  }  
 for(i=0;i<n;i++)  
  od[i]=ar[i];  
  for(i=0;i<n;i++)  
  for(j=i+1;j<n;j++)  
  {  
   if(ar[i]>ar[j])  
   {  
   temp=ar[i];  
   ar[i]=ar[j];  
   ar[j]=temp;  
   }  
  }  
  for(j=0;j<n;j++)  
 {  
  for(i=0;i<n;i++)  
  {  
  if(ar[j]==od[i])  
   {   
    if(j==0)  
    {  
     wt[i]=ar[j];  
     b=wt[i];  
     tr[i]=ex[i];  
     c=tr[i];  
     break;  
    }  
    wt[i]=temp-ar[j]+ar[j-1];  
    b=b+wt[i];  
    tr[i]=ex[i]+wt[i];  
    c=c+tr[i];  
    break;  
   }  
  }  
  temp=tr[i];  
 }   
  b=b/n;  
  c=c/n;  
  printf("\n ORDER NAME ARRIVAL-TIME EX.TIME WAITING-TIME TURN-AROUND-TIME \n");  
  for(j=0;j<n;j++)  
  for(i=0;i<n;i++)  
  {  
  if(ar[j]==od[i])  
  {  
  printf("  %d  P%d\t %d      %d\t   %d\t\t  %d ",j+1,i+1,ar[j],ex[i],wt[i],tr[i]);  
  printf("\n");  
  break;  
  }  
  }  
  printf("Average waiting time = %f \n Average turn around time = %f \n",b,c);  
 }  


Saturday, December 10, 2011

What is Abstraction?The Concept of Abstraction Simplified.


What is Abstraction in Object Oriented Programming?
Abstraction can be formally defined as the representation of an object including the specification of that object in a certain context.Abstraction is a powerful means to tackle the complexity of programming by wrapping up and thus reducing the complexity of complex operations.

Abstraction is used in OOP(Object Oriented Programming) Languages like Java,C++ etc.These OOP Languages employ an abstract entity called class from which instance of that class called object can be created.Data and Code are Binded together in a syntactic container called Object.

These statements can be little confusing for beginner's so read the rest of the post to get a better view of abstraction.


Abstraction Defined in a Simple way :

The concept of abstraction is a little confusing of beginner's.

To understand the concept of abstraction easily consider a cactus which has lots of spines placed in box.You can easily carry the box without knowing that a cactus is in it.But it is difficult to carry the cactus with bare hands.Thus Abstraction serves as a box to wrap up the complexities.


In programming subprograms are examples of abstractions,as they can be used to perform a function without knowing the internal details.eg: a function named add(int a,int b) can be used to add two integers and produce a result by simply using the code add(1,2) in the program.The internal details of the function that performs addition is not known to the programmer or to the main program.These details are abstracted and this provides a higher level view.


Abstraction simplifies programming as the programmer needs to focus only on the task he has to perform rather that the internal details of the program.Abstraction are provided in Libraries(.dll) for different operations.

Abstraction is implemented commonly in programming languages by using an data type called class.Objects are Instances of a class 

eg:Car is a class Audi,Mercedes etc are Objects of the class named car


 Each Object is an a clone of the an abstraction(class),it posses all the traits of class eg:Mercedes and Audi are two brands of cars but they posses all the characters of a the main class car.Thus they are Objects created from the Abstraction Car.The term Car is used to Abstract or wrap up the internal details like engine,wheels,brakes etc in a single container  named car.


Data Hiding is a Concept of Abstraction by which the Code and the Data in an Object(Instance of an Abstract Data type usually referred to as class) is hidden from the external entities. 

Saturday, December 3, 2011

Round Robin Process Sheduling Algorithm and Example Source Code in C

Round robin is the most widely used process scheduling algorithm .The basic strategy for round robin scheduling is that if there are n process,each of the process will receive 1/n CPU Execution Time.Each process is allotted a  time quanta, for which its is executed.The incoming processes are kept in a ready list while another one is executing.If the time quanta allotted for a process is over,then that process is moved to ready and the next process in the ready list is executed for the allotted time quanta.The Complete Example Implementation Source Code in C of Round Robin Algorithm to schedule N Processes and to calculate the Execution,wait time and turn around time is given below.
 #include<stdio.h>  
 void main()  
 {  
  int n,i,k,x=0,s=0,r=0,q=0,x=0,a[30],e[30],t[30];  
  float m,p=0;  
  printf("Enter the number of process:");  
  scanf("%d",&n);  
  printf("Enter the execution time:");  
  for(i=0;i<n;i++)  
  {  
  scanf("%d",&a[i]);  
  e[i]=a[i];  
  }  
  printf("Enter the quanta:");  
  scanf("%d",&q);  
  printf("After round robin sheduling:");  
  for(i=0;i<n;i++)  
  {  
  if(x<a[i])  
  {  
   x=a[i];  
  }  
  }  
  k=x/q;  
  while(s<=k)  
  {   
  for(i=0;i<n;i++)  
  {  
   if(a[i]>0)  
   {  
   if(a[i]>q)  
   {  
   r=r+q;  
   a[i]=a[i]-q;  
   printf("P%d\t",i+1);  
   }  
  else  
  {  
   r=r+a[i];  
   a[i]=a[i]-q;  
   printf("P%d ",i+1);  
   t[i]=r;  
  }  
  }  
 }  
 s++;  
 }  
 printf("\nPROCESS EXECUTION TIME  WAIT TIME  TURN AROUND TIME\n");  
 for(i=0;i<n;i++)  
 {  
  printf(" %d \t\t %d\t\t %d\t\t %d\t\t \n",i,e[i],x,t[i]);  
  x=x+q;  
 }  
 m=x/n;  
 printf("Average waiting time=%f",m);  
 printf("Average turn around time=");  
 for(i=0;i<n;i++)  
 p=p+t[i];  
 p=p/n;  
 printf("%f",p);  
 }  

Thursday, December 1, 2011

How to create Self Extracting Executable using iexpress wizard


Windows has an inbuilt utility called iexpress that can be used to create self extracting archives or executables.IEXPRESS is used for the creation and distribution of self extracting exectables or setups or Packages.
Iexpress can be used easily to create your own setup or self extracting file that extracts and runs the desired program .Following is a step by step instructions for creating self extracting executable using the iexpress wizard.

  • Go to run type in iexpress.exe


  • The iexpress wizard will open up,where you need to configure your setup or self extracting executable


  • Select create a new self extracting directive as you are creating a new self extracting archive once your setup is configured you can save the SED( self extracting directive)

  • Now select the type of Self Extracting Executable from the next iexpress windows,Select the Option 'Extract Files Only'.You can try out other options later.


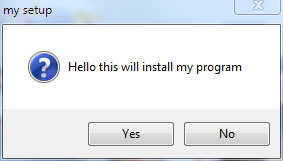
  • Enter the Title eg: my setup

  • Enter the Welcome Message

  • Choose if you want to display a license before the installation,This will be shown before the installation begins.Text files can be used for this purpose.


  • Then add the required files that should be installed or extracted by the self extracting executable.I add some photos then proceed to  the next step.


  • In the next Window select the style of the setup

  • Enter the Message to show after extraction is complete 

  • Choose the Path to save the Self extracting executable or the Package that you are about to create
  • Choose if you want to save the configuration as a SED file for future use


  • Wait for the Creation to complete.


  • All Done!Open your own self extracting executable created with iexpress


Tuesday, November 29, 2011

Is your Cloud Secure?Security Vulnerabilities Discussed


With the rise of cloud computing users can seamlessly share data among different devices with ease.There are a number of cloud services available now as the enterprise or personal demand for effective data storage has increased. Users easily switch to or avail cloud services without thinking much about the security issues involved in the cloud.


Is your confidential data stored in the cloud secure? How vulnerable is your data cloud?


I'm trying to  address these two issues in this article


Security:


There are Possibilities of virus or malware infections even-though the cloud is equipped with Anti-Mal ware and Antivirus Technologies.As you may or will be sharing the hardware used by another user to access your data there are possibilities of external attacks focusing on this cloud characteristic.There are many formats of files uploaded to cloud there are chances that a file downloaded may be infectious because the cloud Antivirus may be outdated.
A cloud is based on mainly 3 components WebApplications and Services,Cryptography(layer) and the  virtualization technique used to give you the feeling that you are using your own system.These basic components have their own security vulnerabilities.


Stability and Integrity:
You give all your valuable data to a company and one day they say that that are going to close down.What will you do?You will say that i will take a backup,but if it is a sudden problem and all your data is lost?


You cannot rule out such possibilities even though slim.So you cannot trust any cloud provider 100%.Cloud Severs requires high computing power and high Up time in order meet your requirements ,it may not be met on all situations.


How to Reverse a Video Quickly and Easily with Virtual Dub


Have you watched Videos being played from from the end to start ie:In a Reversed Manner in Movies.
eg:cars going backwards .Some of You might be Wondering how to do this? You can easily Reverse a Video and make it playback from the end point to start  in a reversed manner.This Tutorial will teach you ,how to reverse a video easily without any costly video editing tools.


Before starting, You need some free Tools Virtual Dub -A free video editor for editing and encoding  and AviSynth(A Script based utility used for Video Editing)


Download Virtual Dub from www.virtualdub.org


Download AviSynth from www.avisynth.org


Extract the Archive containing Virtual Dub to a required folder and then install AviSynth using the Setup provided.


Following are step by step Tutorial to reverse a Video using Virtual Dub and Avisynth
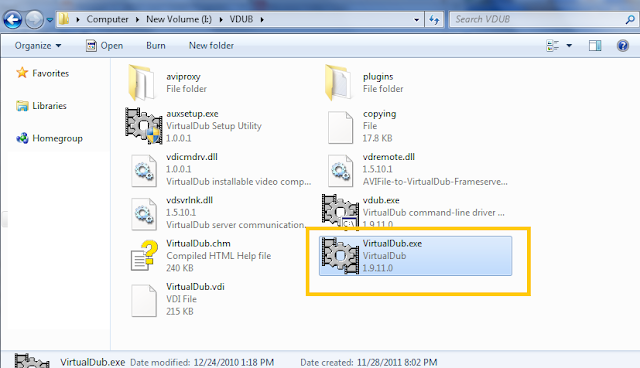
  • After Installing Virtual Dub and Avi synth,Open Virtual Dub( Virtual Dub.exe)


  • Open the Video which you want to reverse by  going to File>Open Video File
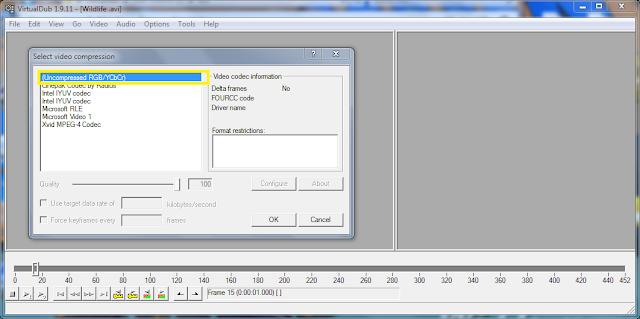
  • Go to Video>Compression and a dialog will open up asking you to select a Video Codec,You will have to save the video without any compression in order to reverse it.So,select 'Uncompressed RGB/YCbCr"


  •  Click on OK,Then you will have to save a copy of this uncompressed video.To do that go to File>Save as AVI,then save the copy by giving a new file name,in my case I'm  giving the name as 'Reverse.avi'
  • Click on Save,Dialog box will open up giving the progress of the video Rendering wait for it to complete
  • After Completion  go to the folder that you have placed the Uncompressed video(Reverse.avi) and Create a New Text File(.txt) in that folder and enter the following line into it
       AviSource("Your Video File Name").Reverse()
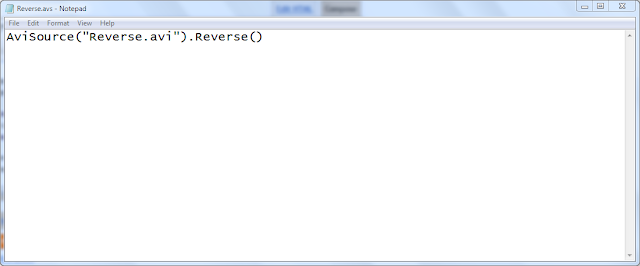
       In my case,since i have saved the video with the name Reverse.avi,i enter the following line to the text file        AviSource("Reverse.avi").Reverse()
        This Serves as the Script for Avisynth for reversing the Video
  • Save this Text document with same name of the Video with .avs extension ,in my case i save it as 'Reverse.avs' in the same folder which has the uncompressed video file ('Reverse.avi') which requires the reversing effect to be applied.
  •  Now,Open Virtual Dub and Go to File>Open Video File and Open this .avs file(Reverse.avs) .The Video will open Up.

  • In order to apply reverse effect ,Got to File>Save as Avi,Give the name for the Reversed Avi file and Click on Save,Wait for the rendering to complete.Once done open the newly created Video file and see the magic, the video will be played from end to start ie:it will be reversed.
Note:The Uncompressed Video file will be of large size ,you can reduce the size of the Reversed Video by Opening Virtual Dub and Going to Video>Compression and selecting the desired compression codec,say XVID.If you are unable to open the video file in Virtual Dub due to some codec issues Download the Klite Codec Pack http://www.free-codecs.com/download/k_lite_codec_pack.htm and Install it.

                        If you like This Article Please Comment on it.

Thursday, November 24, 2011

The Unsolved 'This is Not a True Type Font' Exception in C# Revealed and the Final 'SOLUTION'

Almost all Forums have a Discussion relating to 'Only true type fonts are Supported.This is not a true Type Font' Exception thrown in C#/.NET when a non true type font or a true type font with invalid metadata is selected from a Font Dialog.
This exception occurs because GDI+ Only supports True Type fonts. Modern/open type fonts are  not Supported by C#.Open Type fonts has been created by merging the old True Type and PostScript Fonts, as the result the Open type font may have a true type or postscript specification.

Although the Font Dialog control was designed to filter out these Non True Type fonts by using ChooseFont() API call with the CF_TTONLY option ,some Fonts may represent or call themselves as true type fonts.These are the Fonts with bad/Invalid MetaData that causes the Exception.

The Solution???
Unfortunately there is NO SOLUTION,I have found articles on the web giving the following solutions these include
  • Setting FontDialog.AllowSimulations property to false.
  • Setting FontDialog.AllowScriptChange property to false
These don't solve the Problem,A person had reported this bug to MicroSoft and here is their Reply:


Posted by Microsoft
This is a GDI+ issue and no changes are planned to that code base, therefore we cannot fix this bug. 
Posted by Microsoft
The Microsoft Sub-status is now "Investigating" 
Posted by Microsoft 
Note to customer: This only seems to be an issue at design time. You *can* set the font to VisualUI at runtime. We will continue looking into this from the designer perspective. 
Posted by Microsoft
Thanks for reporting this bug, we have been able to repro this issue and are investigating. 
Posted by Microsoft
The Microsoft Sub-status is now "Reproduced"
Thanks for reporting this bug, we have been able to repro this issue and are investigating.


This was Reported in 2005 and there is not a solution yet.The only Solution that i can offer is designing your own custom font picker or font selector that displays only true type fonts using the FontFamily class that returns only valid true type fonts. 
See these links to get started
Custom Font Dialog in WPF
Color and Font Selector Project hosted at Code Project
So,these are the currently available solutions to the Invalid Font Problem of the Font Dialgo control in C#.
Comments are always appreciated.

Thursday, November 17, 2011

C Program to implement Inter Process Communication(IPC) by using Pipe

Inter Process communication is a technique by which a thread in one process shares some information with threads in other processes.A pipe is a buffer,specifically a FIFO(First in First Out) buffer that has 2 ends,a read end and a write end.A thread can write or read depending on the file reference it has.
read() is used to read data and write() is used to write data.

The following is an implementation of Pipe in C Language.There is a main process P1 and 2 child processes C1 and C2 , the main process reads a string and passes it to one of the child process ,the child process C1 receive string from P1,find its length and sends the value to P1.C1 also reads an integer array of length equal to the length of the string and sends it to C2.C2 receive integer array from C1,find the sum of the elements and sends the sum to the parent process P1.The sleep() function is used in the program to suspend the processes for a desired interval of time.
The complete C language source code of  this example program that  implements IPC(Interprocess Communication) using PIPE is given below.
 #include<stdio.h>  
 #include<unistd.h>  
 #include<string.h>  
 void main()  
 {  
 // www.c-madeeasy.blogspot.com  
  int pid[2],pid1[2],pid2[2],pid3[2],pid4[2];  
  int a[20],i,l,s=0;  
  char str[20];  
  pipe(pid);  
  pipe(pid1);  
  pipe(pid2);  
  pipe(pid3);  
  pipe(pid4);   
 if(fork()==0)  
 {  
  sleep(5);  
  close(pid[1]);  
  read(pid[0],str,sizeof(str));  
  for(i=0,l=0;str[i]!='\0';i++)  
  l=l+1;  
  close(pid3[0]);  
  write(pid3[1],&l,sizeof(l));  
  sleep(6);  
  printf("Enter %d array elementz:",l);  
  for(i=0;i<l;i++)  
  scanf("%d",&a[i]);  
  close(pid1[0]);  
  write(pid1[1],a,sizeof(a));  
  close(pid4[0]);  
  write(pid4[1],&l,sizeof(l));  
 }  
 else if(fork()==0)  
 {  
  sleep(2);  
  close(pid1[1]);  
  close(pid4[1]);  
  read(pid4[0],&l,sizeof(l));  
  read(pid1[0],a,sizeof(a));  
  for(i=0;i<l;i++)  
  s=s+a[i];  
  close(pid2[0]);  
  write(pid2[1],&s,sizeof(s));  
 }   
 else    
 {  
  printf("\nEnter string:");  
  scanf("%s",str);  
  close(pid[0]);  
  write(pid[1],str,sizeof(str));  
  sleep(7);  
  close(pid3[1]);  
  read(pid3[0],&l,sizeof(l));  
  printf("\nThe string length=%d",l);  
  sleep(8);  
  close(pid2[1]);  
  read(pid2[0],&s,sizeof(s));  
  printf("\nSum=%d",s);  
 }  
 }  

Saturday, November 12, 2011

What is Google 2 Step Verification and How to Setup it ?


  • What is Google 2 Step Verification?
Google 2 Step Verification is an additional security measure provided by google to prevent your mail account from being hacked.2 Step Verification involves a series of two primary steps while signing into your google account
The First step is usual signing in with your User ID and password  the second step is entering a one time use code generated by google which will be send to your phone by SMS or by a Voice Call.


  • How to Setup Google 2 Step Verification for Your Google Account?
You can easily setup the 2 step verification procedure for your google account with a few clicks.Before setting up make sure that you have setup-ed an alternative e-mail id,to recover your password in case you have lost or forgotten to take your  phone.
Given below is a step by step tutorial to setup 2 step verification for your google account
  • Log In to your google account then go to http://www.google.com/accounts
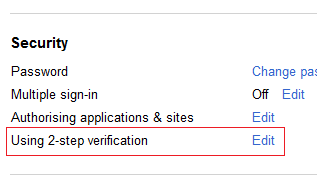
  • From the Account Overview Panel click on the 'Edit' link next to Using 2-step verification in the Security Section.

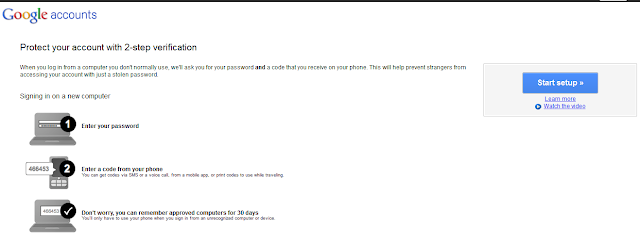
You will be asked to enter your password for  validation then you will be taken to the sign up page for 2 step verfication.

 
  • Click on 'Start Setup' and you will be directed to another page
  •  Enter your Mobile Number and choose the method of verification (SMS/Voice call).
  • Click on Send Code.Depending on the type of verification you will receive a sms or voice call from google providing the verification code.Enter the Code and click on verify.
  • In the next page you will be asked whether to remember this computer for 30 days so that you don't need to enter the code for next 30 days. After 30 days a new code will be send to you.If you uncheck this option you will need to enter a newly generated code every time you log in

  • In the Next Page Click on TURN ON 2 STEP VERIFICATION.Done,the process is now complete.
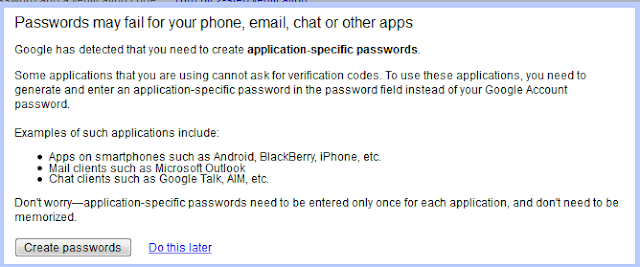
  •  The next page will greet you with a message lke this
  • This only necessary if you use the  Other Softwares or Apps as Stated.So just click on 'Do this Later'
  • Done!Your Google account is now secured with two layers of protection.This is a very good solution that google offers to protect its users from account theft when using other computers to login to your their google account.
Have any Queries or want to say thanks,then leave a comment.

    Wednesday, November 9, 2011

    A Good and free Custom Progress Bar Control with Adjustable Color for C#

    The customization options for the progress bar control in .NET/C# is highly limited as the progress bar will take up the default color pattern/visual style of the current operating system.You cannot change the back color or fore color of the progress bar even though the IDE/Visual Studio offers such options.
    When the program is executed since the visual styles are enabled the progress bar will take up the visual style of the current operating system.You can solve this iisue by disabling the visual styles for your application by removing this line

    Application.EnableVisualStyles 

    from your starting class,But doing this will make your application look classic.So How can you solve the progress bar color issue? A better option is to go for third party progress bar controls for c#.There are lots out there,but you got to pay for it.
    Also there are some pretty impressive controls available for free.Progress Bar Plus

    http://www.codeproject.com/KB/progress/ProgBarPlus.aspx is such a project hosted at CodeProject.


    It offers variety of designs,colour patterns,shapes whatever you wnat for free.The implemetation instructions are provided at this link.The project is licensed under The Code Project Open License (CPOL) and is free to be used without paying a fortune.


    Sunday, November 6, 2011

    How to Recharge BSNL 3G DataCard Online

    There are a lots of Online Services Offering to Recharge your Mobile,DTH or DataCards.But you might not have found at least one offering recharge or denomination for your BSNL 3G Data Card.BSNL Itself offers this facility but it does not have support for Most Debit Cards so you have to look out for other services.

    In this Post will tell you how recharge your BSNL 3G DataCard Online using your credit/debit card or net banking.PayTM is an Online recharge service offering mobile recharge for all operators,they also provide the facility add denomination or recharge for your 3G Data Card.
    Follow these simple steps to recharge your data card


    • Select your Operator as BSNL and Operator Circle.
    • Enter the Exact Denomination /Recharge amount as stated by by BSNL in your circle  that will give you a specific amount of data usage.Below is the Recharge chart provided by BSNL on their Website.        
    Data RCV in Rs.(Inclusive Service Tax)
    Day/Any time usage in MB
    Night * usage in MB
    Total bundled free Usage in MB
    Validity (days)**
    Data Charges in Rs./10KB*** (except APN 'bsnlstream')
    Data Charges in Rs./MB***(For APN bsnlstream)
    100
    225
    225
    15
    0.04
    0.25
    200
    500
    500
    15
    0.04
    0.25
    400
    1000
    1000
    30
    0.04
    0.25
    606
    1000
    2000
    3000
    30
    0.04
    0.25
    716
    2000
    2000
    30
    0.04
    0.25
    1250(750)
    5000
    5000
    30
    0.04
    0.25
    1800(1260)
    10000
    10000
    30
    0.04
    0.25
    2250(1575)
    15000
    15000
    30
    0.04
    0.25
    2500
    20000
    20000
    60
    0.04
    0.25
    3000
    30000
    30000
    90
    0.04
    0.25
    3100
    15000
    15000
    180
    0.04
    0.25
    5000
    30000
    30000
    180
    0.04
    0.2

    • Click on Proceed,they will ask you to create user account,create one and choose the Mode of Payment as per your choice.After the Payment has been Processed you will have received your denomination you have requested.

    Saturday, November 5, 2011

    HD or Full HD?What to Buy?Need to Know Buying Advice before you Buy

    Today most TV's and Monitors offer support for HD Content.HDTV has become common and offers wide range of functionality including smart applications  and 3D Support.HD Ready Display comes in two variants
    • HD(720p)
    • FullHD(1080p)

     At leastsome of us are confused by this specifications and has difficulty in deciding what to buy.
    Full HDTV(1080P) Cost more than a HDTV(720p).So before you buy there are some things you need to know
    • What is the difference between HD and FullHD?
           HD Ready Displays offer a Native Resolution of 1366x768 pixels while a Full HD TV offers     
           1920x1080 pixels native resolution.Native Resolution is the Original or the Normal Resolution
           at which the display device is configured to display images.Images needs to be down scaled or
           upscaled if it is not matching the native resolution of the Display.
           So HD Display can display up to a Resolution of 1366x768 pixels while Full HD  can display
           images of resolution up to 1920x1080 pixels.Smaller or Larger or smaller images are Unscaled \
           or Down scaled as Necessary.  
    •  What is the Relation Between Screen Size and Capability to Display HD or Full HD Content?
              There is no need to buy a Full HD Display/HDTV if you are Buying a television of screen size
              less than 42 Inches.You will not be able to observe any difference between HD or Full HD
              Content on a Smaller screen like a 32 inch TV.So there is no point in buying a Full HD Display
              if you are looking for a Screen size less than 42-50 Inches.

     So,if you are Planning to buy a HDTV or Display.Please Make sure that you only go for Full HD if you  are looking for a screen size of at least 42 inches.

    Sunday, October 30, 2011

    C++ Program to check whether a String or a Number is Palindrome using function overloading

    The following C++ program uses function overloading to check if the entered string or number is palindrome using a overloaded function 'pal'.The function is overloaded by specifying two variants of attributes , the first one an integer for Number Palindrome and the second a character array for String Palindrome.
    1)void pal(int n) 2)void pal(char a[])
    The Complete Source Code is Provided Below.If you have any queries, Just comment on this Post.
     #include<iostream.h>  
     #include<conio.h>  
     #include<stdio.h>  
     #include<string.h>  
     //c-madeeasy.blogspot.com  
     void pal(char a[])  
     {  
     int i,j,l=0;  
     l=strlen(a);  
     int f=0;  
     for(i=0,l=l-1;a[i]!='\0';i++,l--)  
     {  
     if(a[i]!=a[l])  
     {  
     f=1;  
     break;  
     }  
     }  
     if(f==1)  
     {  
     printf("NoN Palindrome");  
     }  
     else if(f==0)  
     printf("Palindome");  
     }  
     void pal(int n)  
     {  
     int a,s=0,d;  
      a=n;  
     while(n>0)  
     {  
     d=n%10;  
     s=s*10+d;  
     n=n/10;  
     }  
     if(a==s)  
     cout<<"Palindrome";  
     else  
     cout<<"Non Palindrome";  
     }  
     void main()  
     {  
     clrscr();  
     int c=0;  
     do  
     {  
     cout<<"\n1.String Palindrome 2.Number Palindrome 3.Quit";  
     cout<<"\nEnter Choice: ";  
     cin>>c;  
     switch(c)  
     {  
     case 1:  
     cout<<"Enter the String: ";  
     char a[20];  
     cin>>a;  
     pal(a);  
     break;  
     case 2:  
     cout<<"Enter the Number: ";  
     int t;  
     cin>>t;  
     pal(t);  
     break;  
     case 3:  
     break;  
     default:  
     break;  
     }  
     }while (c!=3);  
     }  
    

    C++ Program to Add ,Substract,Multiply and Divide Complex Numbers Using Operator Overloading

    The following menu driven C++ program uses operator overloading to to perform Addition,Subtraction,Multiplication and Division of two complex numbers.Here Operators +,-,* and / are overloaded to perform the required operations with the desired objects.
    eg:a*b in the terms of overloading means is to perform the '*' Operation associated with object a on object b.
    The Complete Source Code is given below.If you have any Queries Just Comment on the Post.
     #include<iostream.h>  
     #include<conio.h>  
     #include<string.h>  
     #include<stdio.h>  
     class complex  
     {  
      int i,r;  
      public:  
      void read()  
      {  
      cout<<"\nEnter Real Part:";  
      cin>>r;  
      cout<<"Enter Imaginary Part:";  
      cin>>i;  
      }  
      void display()  
      {  
      cout<<"\n= "<<r<<"+"<<i<<"i";  
      }  
      complex operator+(complex a2)  
      {  
      complex a;  
      a.r=r+a2.r;  
      a.i=i+a2.i;  
      return a;  
      }  
      complex operator-(complex a2)  
      {  
      complex a;  
      a.r=r-a2.r;  
      a.i=i-a2.i;  
      return a;  
      }  
      complex operator*(complex a2)  
      {  
      complex a;  
      a.r=(r*a2.r)-(i*a2.i);  
      a.i=(r*a2.i)+(i*a2.r);  
      return a;  
      }  
      complex operator/(complex a2)  
      {  
      complex a;  
      a.r=((r*a2.r)+(i*a2.i))/((a2.r*a2.r)+(a2.i*a2.i));  
      a.i=((i*a2.r)-(r*a2.i))/((a2.r*a2.r)+(a2.i*a2.i));  
      return a;  
      }  
     };  
     void main()  
     {  
     int ch;  
     clrscr();  
     complex a,b,c;  
     do  
     {  
      cout<<"\n1.Addition 2.Substraction";  
      cout<<" 3.Mulitplication 4.Division 5.Exit\n";  
      cout<<"\nEnter the choice :";  
      cin>>ch;  
      switch(ch)  
      {  
      case 1:  
           cout<<"\nEnter The First Complex Number:";  
           a.read();  
           a.display();  
           cout<<"\nEnter The Second Complex Number:";  
           b.read();  
           b.display();  
           c=a+b;  
           c.display();  
           break;  
      case 2:  
           cout<<"\nEnter The First Complex Number:";  
           a.read();  
           a.display();  
           cout<<"\nEnter The Second Complex Number:";  
           b.read();  
           b.display();  
           c=b-a;  
           c.display();  
           break;  
      case 3:  
           cout<<"\nEnter The First Complex Number:";  
           a.read();  
           a.display();  
           cout<<"\nEnter The Second Complex Number:";  
           b.read();  
           b.display();  
           c=a*b;  
           c.display();  
           break;  
      case 4:  
           cout<<"\nEnter The First Complex Number:";  
           a.read();  
           a.display();  
           cout<<"\nEnter The Second Complex Number:";  
           b.read();  
           b.display();  
           c=a/b;  
           c.display();  
           break;  
      }  
      }while(ch!=5);  
     getch();  
     }  
    

    Saturday, October 22, 2011

    How to Repair and Play Corrupted Video Files or Unjoined(.001) files with Missing Parts :The Ultimate Guide


    Sorry Post is under Inspection for Reported problem in one of the Third party Tools used for Repairing .Will re-post with a new tool Soon.


    Thursday, October 13, 2011

    How to Restore Closed Tabs in Firefox

    Often there are situations in which you accidentally close a tab that you were using in Firefox.You don't need to dig up all the history to find the address of the website you were in.Just Follow these simple steps to restore closed tabs in firefox.
    • Go to Menu>History
    • There you will find a selection called Recently Closed Tabs.Click on it,you will find a list of recently closed webpages,Click on the one you want.Done! the page is back again.

    Friday, October 7, 2011

    Using DotNetZip to Compress all the Files in a Folder in C#

    The inbuilt Compression class GzipStream class(System.IO.Compression) for C# does not provide the ability to compress all the files within a folder.You can do this by just few lines of code and just forgetting the techinical aspects behind it by using DotNetZip(Ioniczip).DotNetZip is a free class library that can be used for creating and editing zip files.

    The project is Hosted at CodePlex check out http://dotnetzip.codeplex.com
    To use DotNetZip Library in your C# Project follow these steps
    • Download the latest release from http://dotnetzip.codeplex.com/releases/
    • Add a Reference to DotNetZip from your project by going to Project> Add Reference .Browse for Ionic.Zip.dll in the release that you have downloaded.
    • Then add the reference in your project by adding the statement 'using Ionic.Zip'
    • Then use the code given below to create a zip file from a folder
     using (ZipFile zip = new ZipFile())  
     {  
       zip.AddDirectory(@"thefoldertoadd");  
       zip.Save("pathToSaveZipFile");  
     }  
    

    Saturday, October 1, 2011

    How to create a Toggle Button in C#(.NET)

    Toggle Buttons are necessary controls that a programmer may require for developing winform applications,but
    toggle button Control is not included in the Standard C# IDE as a Control but it can be created by using the CheckBox Control.

    The following steps describes creating a Toggle Button Control from a check box Control in C#

    • Add a Check Box Control to the Windows Form Application Form from the Tool Box
         
    • Select the Check box and from the Property windows change the Property 'Appearance' from 'Normal' to 'Button'.
    • Done the Toggle Button is Created and is Ready to Go.To use it add the To Do code to its Check Changed Event.

    Sunday, September 18, 2011

    How to Recover Data from damaged or corrupted(Scrached) CD or DVD

    Data Stored in a DVD or CD can be easily be corrupted due to scratches occurring as the result rough handling of the disks.Disks are damaged easily when exposed to high temperatures and chemicals.

    Data can be recovered to an extend from slightly or moderately damaged or corrupted disks which are not broken by the use of a tool called isobuster.The following is a step by step guide on recovering data from damaged CD's or DVD's.

    1. Download IsoBuster from http://www.isobuster.com
    2. Install and Open IsoBuster
    3. Insert the Damaged disk and wait for it to be recognized by IsoBuster .
    4. After the Disk is recognized you can try to extract the complete data of the DVD or CD by selecting the appropriate track>Right Click and Select Extract user data.

    By selecting this option you will be able to store the entire content of the disk to your hard disk in Disk Image formats like .iso,.tar etc.
    If you have any Questions Just Comment on the Post.

    Saturday, September 10, 2011

    TASM Program Source Code to Find Factorial of a Number

    The TASM Assembly Program given below can be used to find the factorial of a number.The Complete Source Code is given below.Check it out and do respond to the post if you have any doubts.
     readnum macro num  
         mov ah,01h  
         int 21h  
         sub al,'0'  
         mov bh,0ah  
         mul bh  
         mov num,al  
         mov ah,01h  
         int 21h  
         sub al,'0'  
         add num,al  
         endm  
     printstring macro msg  
         mov ah,09h  
         mov dx,offset msg  
         int 21h  
         endm  
     data segment  
         cr equ 0dh  
         lf equ 0ah  
         msg1 db 'enter the number',cr,lf,'$'  
         msg2 db 'the factorial is','$'  
         num db ?  
         result db 20 dup('$')  
         data ends  
     code segment  
         assume cs:code,ds:data  
     start:  
            mov ax,data  
            mov ds,ax  
            printstring msg1  
            readnum num  
            mov ax,01h  
            mov ch,00h  
            mov cl,num  
            cmp cx,00  
            je skip  
     rpt1:  
           mov dx,00  
           mul cx  
           loop rpt1  
     skip:  
           mov si,offset result  
           mov bl,[si]  
           call hex2asc  
           printstring msg2  
           printstring result  
           mov ah,4ch  
           mov al,00h  
           int 21h  
           hex2asc proc near  
           push ax  
           push bx  
           push cx  
           push dx  
           push si  
           mov cx,00h  
           mov bx,0ah  
     rpt2:  
           mov dx,00  
           div bx  
           add dl,'0'  
           push dx  
           inc cx  
           cmp ax,0ah  
           jge rpt2  
           add al,'0'  
           mov [si],al  
     rpt3:pop ax  
           inc si  
           mov [si],al  
           loop rpt3  
           inc si  
           mov al,'$'  
           mov [si],al  
           pop si  
           pop dx  
           pop cx  
           pop bx  
           pop ax  
           ret  
           hex2asc endp  
           code ends  
     end start  
    

    Monday, September 5, 2011

    TASM Assembly Program to Find the Largest of N Numbers

    The TASM Assembly program given can be used to find the largest number among the numbers entered to an array.The Complete Source Code is given Below.
     print macro msg  
      mov ah,09h  
      mov dx,offset msg  
      int 21h  
     endm  
     read macro num  
      mov ah,01h  
      int 21h  
      sub al,'0'  
      mov bh,0ah  
      mul bh  
      mov num,al  
      mov ah,01h  
      int 21h  
      sub al,'0'  
      add num,al  
     endm  
     data segment  
      cr equ 0dh  
      lf equ 0ah  
      msg1 db 'Enter the limit ',cr,lf,'$'  
      msg2 db cr,lf,'Enter the no:',cr,lf,'$'  
      msg3 db cr,lf,'$'  
      msg4 db cr,lf,'largest no is',cr,lf,'$'  
      num db ?  
      n db ?  
      arr db 100 dup(0)  
      larg db 8 dup('$')  
     data ends  
     code segment  
     assume cs:code,ds:data  
      start:mov ax,data  
         mov ds,ax  
         print msg1  
         read n  
         mov ch,00h  
         mov cl,n  
         mov si,00h  
         print msg2  
      rept1:read num  
         mov bl,num  
         mov arr[si],bl  
         inc si  
         print msg3  
         loop rept1  
         mov si,00h  
         mov ch,00h  
         mov cl,n-1  
         mov al,arr[si]  
      rept2:inc si  
         mov bl,arr[si]  
         cmp bl,al  
         jb exit  
         mov al,bl  
      exit:loop rept2  
         mov ah,00h  
         mov si,offset larg  
         call hextoasc  
         print msg4  
         print larg  
         mov ah,4ch  
         mov al,00h  
         int 21h  
     hextoasc proc near  
      push ax  
      push bx  
      push cx  
      push dx  
      push si  
      mov cx,00h  
      mov bx,0ah  
     rept3:mov dx,00  
        div bx  
        add dl,'0'  
        push dx  
        inc cx  
        cmp ax,0ah  
        jge rept3  
        add al,'0'  
        mov [si],al  
     rept4:pop ax  
        inc si  
        mov [si],al  
        loop rept4  
        inc si  
        mov al,'$'  
        mov [si],al  
        pop si  
        pop dx  
        pop cx  
        pop bx  
        pop ax  
        ret  
      hextoasc endp  
      code ends  
     end start  
    

    How to Remove the Banbra Trojan:Win32.Banbra.Complete Guide


    Trojan-Banbra (Win32.Banbra) is a malicious threat that allows remote access to your computer for stealing personal information.Given below is the step by step procedure/guide to remove this threat from your PC manually without the need of any specific removal tools.

    1)Start your System in SafeMode by pressing the F8 key while Booting

    2). Delete these files:
    %UserProfile%\Local Settings\Application Data\[random]\[random].exe
    %Documents and Settings%\[UserName]\Start Menu\ About.lnk

    3)In the Run  prompt type 'regedit' and open the registry editor.Click on Edit Menu>Find
       Find and Delete all the entries listed below

     HKEY_CURRENT_USER\Software\Microsoft\Windows\CurrentVersion\Internet Settings 'WarnonBadCertRecving' = '0'
    HKEY_CURRENT_USER\Software\Microsoft\Windows\CurrentVersion\Run 'tmp'
    HKEY_LOCAL_MACHINE\Software\Microsoft\Windows\CurrentVersion\Run
    HKEY_CURRENT_USER\Software\Microsoft\Windows\CurrentVersion\RunOnce
    HKEY_CURRENT_USER\Software\Microsoft\Windows\CurrentVersion\Run 'Protection Center'v
    HKEY_CURRENT_USER\Software\Classes\secfile
    HKEY_CURRENT_USER\Software\Microsoft\Windows\CurrentVersion\Run 'Protection Center'

    4)Download this tool http://go.microsoft.com/?linkid=9746384 to Remove the Temporary Internet files of the Internet Explorer or do it manually,

    5)Before Opening any file do a Full System Scan  with any up to date antivirus to remove the junk infectious files generated by the Trojan.Done!Your System is Safe again.

    Saturday, September 3, 2011

    How to Remove Win 32 Sality Virus Easily using a Simple Utility called SalityKiller

    Win32.Sality is a common virus that infects Windows Executable(.exe) files.The exe files that are Infected need not be deleted it can be repaired/healed by using a simple tool called sality killer provided by kaspersky labs.The virus itself has several versions Win32.Sality.aa, Win32.Sality.ae, Win32.Sality.ag,Win32.Sality.bh respectively.Sality Killer can remove/disinfect all variants of win32 sality.

    Here are the Steps to Disinfect or Remove Win32.Sality Infections from your Computer

    1)Download the tool SalityKiller from http://support.kaspersky.com/downloads/utils/salitykiller.zip

    2)Extract the archive to any location.

    3)Run the program SalityKiller.exe


    4)Wait for it to stop the virus threads and remove all Infections from the System.Done!

    5)Restart the System, if required run a Full System Scan using any antivirus tool of your choice with updated virus definitions.


    Monday, August 29, 2011

    How to Develop Android Applications Using Eclipse IDE

    Eclipse is a common Integrated Development Environment  acting as a platform to develop applications with GUI's.Eclipse IDE is also available for Java, for developing Java Applications.Since Android is an Operating System with Java Programming Interface ,applications for Android are mostly Coded in Java.In this Post i will show you how to Configure Eclipse for Developing Android Applications.

    • Enter this URL https://dl-ssl.google.com/android/eclipse/ or http://dl-ssl.google.com/android/eclipse/ into the text box corresponding to the works with label..


    • Wait for the Plugins to be listed ,Check the Boxes ,Click on Next.
    • Wait for the Installation to be completed.Done!Your IDE is ready for developing android apps. 


    Java Program to Check whether a Expression is Valid using Stack

    The Program given below can be used to check whether a given mathematical expression is valid or invalid.The Validation procedure is based on the presence of complementary opening and closing braces.This implementation makes use of stack to push and pop out opening and closing brackets to the stack, as they are encountered in the Expression String.This program pushes opening brackets to the stack and pops out closing braces,checking whether the complementary brace is present at the top of the stack.Finally if the stack is empty the Expression is valid else the Expression is Invalid.

    sample Output:
    Enter the string
    (a+b)-c
    Valid Expression

    Enter the string
    (a+b-c
    Invalid expression
    The Complete Source Code is Provided below
     import java.io.*;  
     import java.lang.*;  
     class array  
     {  
      DataInputStream get=new DataInputStream(System.in);  
      int n,i,top=0,f=0;  
      char a[];  
      String str;  
      void getdata()  
      {  
      try  
       {  
       a=new char[30];  
       System.out.println("Enter the string");  
       str=get.readLine();  
       n=str.length();  
      }  
      catch(Exception e)  
      {  
       System.out.println(e.getMessage());  
      }  
      }  
      void push(char c)  
      {  
       a[top]=c;  
       top++;  
      }  
      char pop()  
      {  
       char h;  
      if(top!=0)  
       {  
       top--;  
       h=a[top];  
       return h;  
       }  
      else  
      return 0;  
      }  
      int stempty()  
      {  
       if(top==0)  
       return 1;  
       else  
       return 0;  
      }  
      void operation()  
      {  
      char d,t;  
      for(i=0;i<n;i++)  
       {  
       d=str.charAt(i);  
       switch(d)  
         {  
         case '(':  
             {  
              push(d);  
              break;  
             }  
         case '{':  
             {  
              push(d);  
              break;  
             }  
         case '[':  
             {  
              push(d);  
              break;  
             }  
         case ')':  
             {  
              t=pop();  
              if(t!='(')  
              f=1;  
              break;  
             }  
         case '}':  
             {  
              t=pop();  
              if(t!='{')  
              f=1;  
              break;  
             }  
         case ']':  
             {  
              t=pop();  
              if(t!='[')  
              f=1;  
              break;  
             }  
         }  
         }  
      if(f==0&&top==0)  
      {  
       System.out.println("Valid Expression");  
      }  
      else  
       System.out.println("Invalid expression");  
      }  
     }  
     class validexp  
     {  
      public static void main(String arg[])  
      {  
       array obj=new array();  
       obj.getdata();  
       obj.operation();   
      }  
     }  
    

    Which is the Best Photo Watermarking Software

    Photo Theft is becoming more and more common in the web with the outburst of social websites like Facebook,Google Plus and Image sharing se...